Since OpenVPN isn’t too chatty about failures in its default configuration, this took me a couple of tries to get right. Hopefully this post can save you some of the time I wasted.
In the following example, I’m assuming you already have a Raspberry Pi, running Raspbian and that you can access it over the local network. From the snippets below, change the example ip 192.168.3.14, to the ip of your local device.
Router
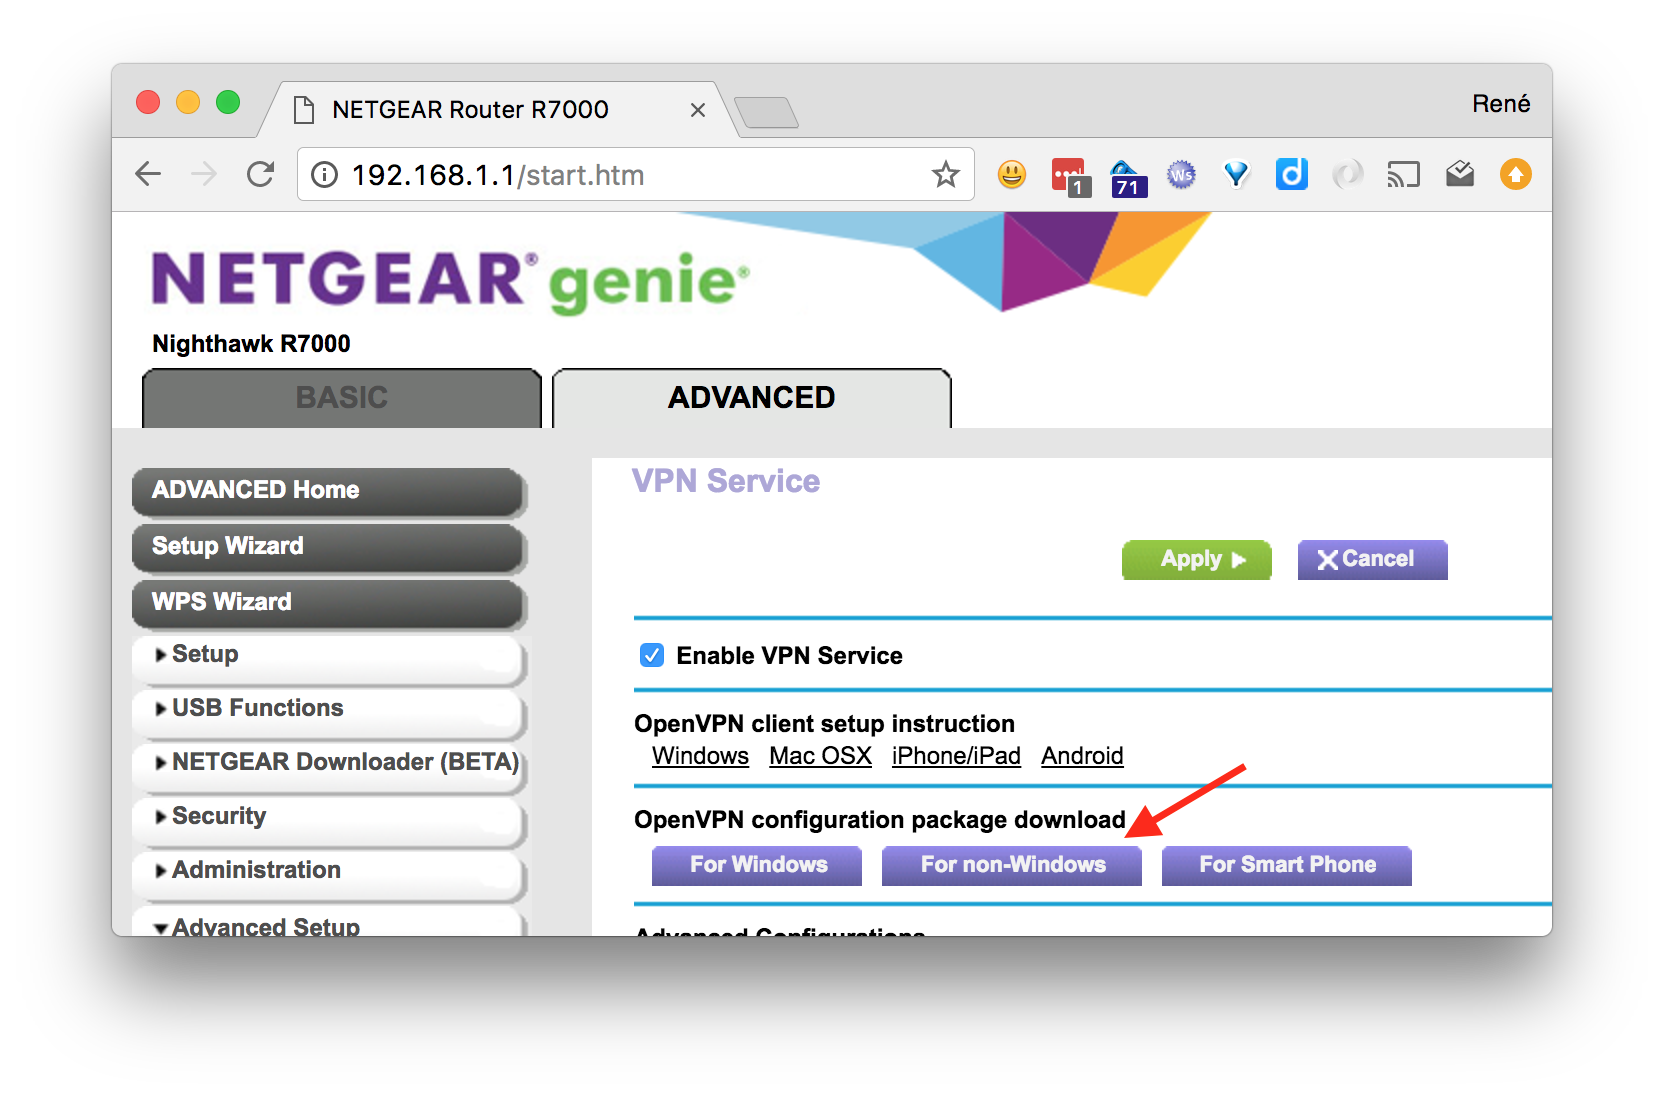
Start off by enabling the vpn service on the router, by going to ADVANCED > Advanced Setup > VPN Service, then check off Enable VPN Service and then click Apply.
When that is done and the router has rebooted, go back to the same page and download the VPN configuration zip file, nonwindows.zip, and copy it to the Pi:
rene $ scp nonwindows.zip pi@192.168.3.14: |
Pi
Log in to the Pi and set up OpenVPN:
rene $ ssh pi@192.168.3.14 pi:~$ sudo apt-get update && sudo apt-get install openvpn |
Once the installation is complete, add the configuration to openvpn:
pi:~$ unzip nonwindows.zip pi:~$ sudo cp client2.conf ca.crt client.crt client.key /etc/openvpn/ pi:~$ sudo chown root:root /etc/openvpn/{client2.conf,ca.crt,client.crt,client.key} pi:~$ sudo chmod 600 /etc/openvpn/{client2.conf,ca.crt,client.crt,client.key} pi:~$ ls -la /etc/openvpn/ total 28 drwxr-xr-x 2 root root 4096 Jul 13 14:13 . drwxr-xr-x 70 root root 4096 Jul 13 14:44 .. -rw------- 1 root root 1253 Jul 13 13:57 ca.crt -rw------- 1 root root 3576 Jul 13 13:57 client.crt -rw------- 1 root root 891 Jul 13 13:57 client.key -rw------- 1 root root 180 Jul 13 13:57 client2.conf -rwxr-xr-x 1 root root 1301 Nov 19 2015 update-resolv-conf |
Assuming you’re the only one accessing this Pi, setting the owner and file permissions isn’t strictly necessary, but nevertheless good practice. There’s no reason that these files should be readable by anyone but root.
Next you should edit /etc/default/openvpn and add a directive for the new configuration to start on boot:
AUTOSTART="client2" |
Now reboot the Pi and verify that a new network device has been added for the remote network:
pi:~$ ifconfig eth0 Link encap:Ethernet HWaddr b8:27:eb:1c:fa:81 inet addr:10.0.0.4 Bcast:10.0.0.255 Mask:255.255.255.0 UP BROADCAST RUNNING MULTICAST DYNAMIC MTU:1500 Metric:1 RX packets:4228 errors:0 dropped:0 overruns:0 frame:0 TX packets:1781 errors:0 dropped:0 overruns:0 carrier:0 collisions:0 txqueuelen:1000 RX bytes:820993 (801.7 KiB) TX bytes:246368 (240.5 KiB) lo Link encap:Local Loopback inet addr:127.0.0.1 Mask:255.0.0.0 inet6 addr: ::1/128 Scope:Host UP LOOPBACK RUNNING MTU:65536 Metric:1 RX packets:13 errors:0 dropped:0 overruns:0 frame:0 TX packets:13 errors:0 dropped:0 overruns:0 carrier:0 collisions:0 txqueuelen:1 RX bytes:1320 (1.2 KiB) TX bytes:1320 (1.2 KiB) tap0 Link encap:Ethernet HWaddr da:dd:3a:80:50:7c inet addr:192.168.1.7 Bcast:192.168.1.255 Mask:255.255.255.0 UP BROADCAST RUNNING MULTICAST DYNAMIC MTU:1500 Metric:1 RX packets:621 errors:0 dropped:0 overruns:0 frame:0 TX packets:177 errors:0 dropped:0 overruns:0 carrier:0 collisions:0 txqueuelen:100 RX bytes:70344 (68.6 KiB) TX bytes:15922 (15.5 KiB) |
Et voilà, that should be all there is to it!
Addendum
In case something didn’t quite go as planned, enabling some logging might be a good idea. Here’s a filtered list of options related to logging:
pi:~$ openvpn --help | grep log --topology t : Set --dev tun topology: 'net30', 'p2p', or 'subnet'. as the program name to the system logger. --syslog [name] : Output to syslog, but do not become a daemon. --log file : Output log to file which is created/truncated on open. --log-append file : Append log to file, or create file if nonexistent. --suppress-timestamps : Don't log timestamps to stdout/stderr. --echo [parms ...] : Echo parameters to log output. --management-log-cache n : Cache n lines of log file history for usage --mute-replay-warnings : Silence the output of replay warnings to log file. --pkcs11-cert-private [0|1] ... : Set if login should be performed before |
To make use of one of these options, it used to be, that the parameters could be passed in the OPTARGS directive of /etc/default/openvpn, but since OpenVPN has moved to using systemd, this is no longer supported. Relevant bug report.
Instead it is necessary to set them directly in each configuration. E.g. to enable append logging to a file add, edit /etc/openvpn/client2.conf and add the following line:
log-append /var/log/openvpn.log |
According the the man page verbosity is set from 0-11, and by default the vpn configuration from the R7000 has verbosity set to 5. This means the log file can quickly become rather large if left in append mode unattended, so make sure you have enough room on the SD card or remove the option again, when you are done debugging. Alternatively use –management-log-cache or truncate on each run by just using –log.
N.B. In my experience the client can be a bit flaky at times and I’ve often seen the first many connection attempts end in the following errors:
TLS Error: TLS key negotiation failed to occur within 60 seconds (check your network connectivity) TLS Error: TLS handshake failed |
And then after a number of tries, suddenly come through. Don’t ask me why.
Hello and thanks for your instructions, however I’m not getting any new network device. The only thing I can see that is different from yours is this sentence:
drwxr-xr-x 70 root root 4096 Jul 13 14:44 ..
I’m getting 85 not 70. Do you have any clues?
Hi Yngve,
That number is just the number of hard links in the filesystem, for the parent directory “..”, so that shouldn’t have any significance in this context.
Have you tried increasing the log level and taking a look in /var/log/openvpn.log?
Perhaps there’s some error message in the log, that could further clue in on what might be the issue.
Thanks for the swift response! As you probably know by now, I’m a newbie in linux, but I will try to delve into the logs 🙂
OK, so I finally managed to get a logfile, but doesn’t understand much of it. Is it possible I could send it to you so you could have a look?
Link to log: https://pastebin.com/SXYp8m5T
I took the liberty of moving the log output to pastebin. Easier to read from there, than these comment boxes. 🙂
I’m not sure it’ll make much of a difference, but the DNS resolution errors for skog.mynetgear.com, could be fixed by replacing the domain with the corresponding ip in the configuration file.
You should have a line in client2.conf:
remote skog.mynetgear.com 12974
You could try changing to:
remote 46.9.29.72 12974
In order to avoid the DNS lookup. Besides that looks like packets are being dropped going to the router:
Are you by any chance trying to connect the VPN, while the Raspberry Pi is physically on the local-network of the same router?
This I’ve never been able to do myself. The VPN client just wouldn’t connect, from my laptop e.g., if I tried to connect while on the same network, as I was trying to connect to. Which of course wouldn’t make much sense either… 🙂
If you’re doing the setup at home first and then moving the Raspberry Pi to it’s destination network afterwards, you can try doing it over a hotspot from your phone e.g. to get an external connection, inwards to the router on the WAN side.
Also you might find https://forums.openvpn.net/ to be helpful. You’ll likely find people there, more adept at eyeing issues than me. 🙂
Thanks! The first issue you are referring, the ip-address, I think was just that I hadn’t confirmed the dyndns service. I was looking at the log after having made this confirmation and now I can’t see this error anymore. Regarding the last issue I haven’t been trying at all to connect to the vpn client.
But don’t you think that the fact that I don’t have this extra network device, Tap0, is related to the problem?
That is definitely a sign that something is wrong. However, and I don’t know this for sure, I don’t think you’ll see neither a tun or tap virtual device, before a successful connection is actually made to the VPN server.
That is very nice to know, thanks very much! Now I will register on the openvpn forum 🙂
Just want to let you know that your manual is working great! I hadn’t installed the client on the phone, so it was actually working all the time 🙂 Thanks again!
You’re welcome. Good to hear you got it working! 🙂
One final question in trying to understand the client/server relation. Now the openvpn server is on my router and I have a client on my Raspberry and it connects well. Then in my head if I was supposed to reach my surveillance cameras, my NAS server, my Plex server and so on, I would need to install a openvpn client on each of these as well, but that is not the case. I’m able to reach all of them without client installation. Is this how it’s supposed to be, or do I have a major security flaw in my LAN?
You don’t have a security flaw. That’s the beauty of how a VPN works. It “bridges” your client into the existing network. The way to think of it, is as if you had physically plugged your Raspberry Pi into the local network it connects to over VPN.
Beautiful! Thanks for sharing your knowledge, really appreciate! 😀
Hello again! If you are feeling abused by all my questions let me know and I will stop. But you know, the easiest way to knowledge is where you know you will get it, and that’s why I’m using you:-)
My question this time is regarding the openvpn log file. I did append it to see what was happening, but I clearly remember removing it as well after I had it working, but lately I’m experiencing web interface beeing slow when trying to watch the log of other switches in my Domoticz server. So taking a look in the /var/log/ folder the openvpn.log file is there and it’s big and with a timestamp of today. Looking in the /etc/openvpn/client2.conf file the logfile isn’t there. Do you have any idea about that, and can I just delete the file?
No worries. If you don’t need the log file, you can just go right ahead and delete it. You can optionally set the log level to zero with the `verb` option. You should see that option already in the configuration file. From the man page:
--verb n Set output verbosity to n (default=1). Each level shows all info from the previous levels. Level 3 is recommended if you want a good summary of what's happening without being swamped by output. 0 -- No output except fatal errors. 1 to 4 -- Normal usage range. 5 -- Output R and W characters to the console for each packet read and write, uppercase is used for TCP/UDP packets and lowercase is used for TUN/TAP packets. 6 to 11 -- Debug info range (see errlevel.h for additional information on debug levels).Thanks!
Hi Renè. I’m trying OpenVPN but it seems not work. There isn’t tap0 and OpenVPN not start. Can u help me? Thanks
Hi Marco, I would try to get help from the official forums at: https://forums.openvpn.net. Good luck!