Migrating from LastPass to pass

I’ve been using LastPass as a password manager since 2012 and even paid for the Premium subscription, so I could access it from my phone. That specific feature later turned free, and has recently turned paid again. It’s not that I’m unhappy with LastPass per se, or that I wouldn’t want to pay for the service again. I’ve just had my eye on an alternative with a bit more control in the past, e.g. self-hosted Bitwarden. I never did get around to doing it however. It just seemed like a little too much effort for little gain.

That being said, ever since a colleague introduced me to The standard unix password manager, pass, I’ve started to use it alongside LastPass and think it’s a brilliant tool. For that reason, I’ve been wanting to do a setup based on it, to replace LastPass entirely.

Overall pass mostly offers the same core feature as LastPass, in the sense that it provides a means to store a collection passwords or notes in an encrypted manner. LastPass has a few more bells and whistles though. To name a few I’ve found useful:

  • Automatic synchronisation between devices.
  • Access from mobile.
  • Autofill in the browser.

Export / Import

Luckily getting passwords out of LastPass is very easy. The extension provides a direct file download from Account Options > Advanced > Export > LastPass CSV File.

The question is then, how to move the content of this file into pass~/.password-store.

There’s no support for importing random CSV files in pass itself, so my first thought was to write a small script, that would go through the file line by line and issue the corresponding pass insert commands for each entry.

Before doing that, luckily I came to my senses and looked for existing solutions first.

On the homepage of pass there’s a link to an extension for this very problem; pass-import and it supports importing from a LastPass vault. It’s not written by the author of pass though, so the question is whether it can be trusted?

Deciding to feed the entirety of your passwords portfolio to some tool you’ve found online shouldn’t be done lightly, but given the fact that it is linked from the official homepage and appears to have some activity and approval on GitHub, does make it seem trustworthy.

I did look a bit through its source as it appears on GitHub, but didn’t really know what specifically to look for. Also I didn’t find anything that smelled outright like, “send this file over the internet”. For that reason, and the above, I decided to throw caution to the wind and give it a go.

Installing the extension

My install of pass comes from Homebrew, but unfortunately only the pass-otp and pass-git-helper extensions seems to be available as formulae:

$ brew search pass
==> Formulae
gopass              lastpass-cli        pass-otp ✔          passwdqc
gopass-jsonapi      pass ✔              passenger           wifi-password
keepassc            pass-git-helper     passpie

Bummer… It is available from pip though:

pip3 install pass-import

This way of installing it doesn’t integrate with pass in the normal way however:

$ pass import
Error: import is not in the password store.

Not to worry, it is possible to invoke the extension directly instead:

$ pimport pass lastpass_export.csv --out ~/.password-store
 (*) Importing passwords from lastpass to pass
  .  Passwords imported from: /Users/rene/lastpass_export.csv
  .  Passwords exported to: /Users/rene/.password-store
  .  Number of password imported: 392

Marvellous! All of my LastPass vault is now in the pass store.

Missing features

Most important of all is probably synchronising the store between different machines, so let’s take a look at that first.

LastPass synchronises its vault via its own servers. With pass you could achieve something similar, by putting your store on Dropbox or Google drive for instance, but there’s another alternative I think is even better. There’s an option in pass to manage your store as a Git repository and as such, it would allow pushing and pulling from a central Git server.

Now the point of this whole exercise, is to have a solution that provides a lot more control and even though everything in the pass store is encrypted, pushing everything to e.g. GitHub, defeats the purpose somewhat.

Gitea

I’ve opted to self-host an instance of Gitea and use it to host the Git repository for my pass store. UI wise It’s a lightweight clone of GitHub, so it appears very familiar. I won’t get into the specifics of how to set it up here, but the official docs are quite good on that front anyway; Installation with Docker.

The man page for pass, has a very good example of migrating the store to use git in the “EXTENDED GIT EXAMPLE” section.

Whether you choose to self host or use another service for Git, after you’ve initialised the repository through pass and done an initial push, everything should show up in your remote. Encrypted of course.

Cloning the repository on a new machine and copying over your GPG key is basically all that is really needed. Here’s an example moving a GPG key from one machine to another:

hostA $ gpg --list-keys # Find the key-id you need
hostA $ gpg --export-secret-keys key-id > secret.gpg

# Copy secret.gpg to hostB

hostB $ gpg --import secret.gpg

You might need to trust the key on the new machine, but now synchronising additions and removals from the store, is just a git push/pull away.

What about mobile?

I’m an Android user, so for me it turns out this is an easy addition. You only need two apps:

Password Store handles the git interactions and browsing of the password store, whilst OpenKeychain allows you to import your GPG key to your phone.

That part was definitely easier than expected, but obviously this is assuming your phone can reach your git server. I put my Gitea installation on a publicly resolvable hostname, so this was not a problem in my case. Using a VPN client on the phone might also be an option, if you don’t want anything public facing.

The Password Store app doesn’t seem to do autofill, but to be honest, the way overlays work in Android is kind of annoying anyway. I don’t suspect I’ll miss it. A bit of copy pasting is fine by me.

Edit 21/03/21: The Password Store app does support autofill! I just didn’t see it in the input field drop-downs alongside LastPass when I did my initial testing as it is not enabled by default. My apologies for the misinformation.

There’s a radio toggle in Settings > Enable Autofill and enabling it will add Password Store as a system wide Auto-fill service:

Password Store in the Auto-fill service settings

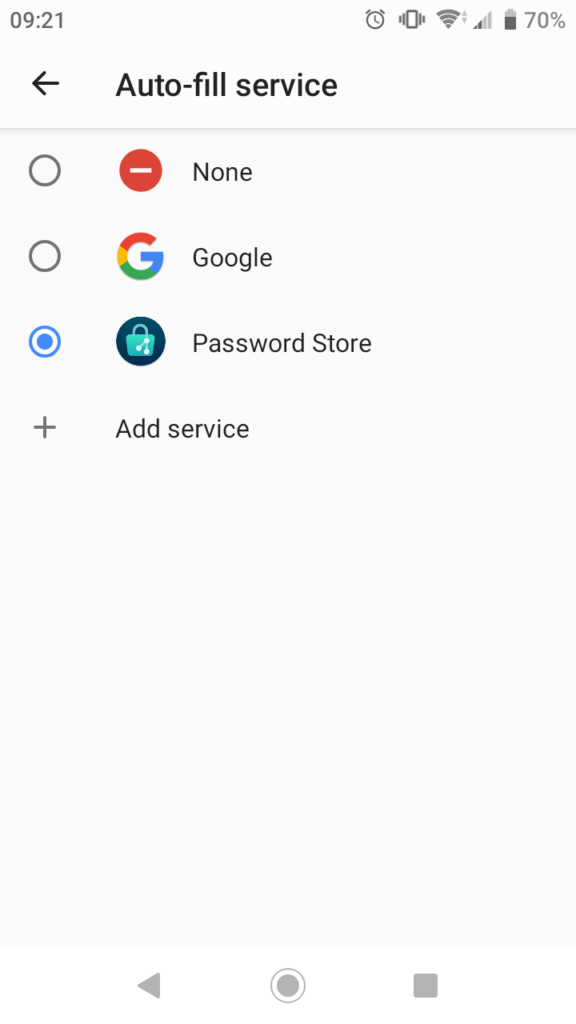
It works similarly to the way LastPass worked, where you can invoke it from an empty input or password field in other apps.

Wrap up

As of today LastPass is gone from my phone, but I’ll keep the browser extension on the desktop around for a little while. Just as a backup.

On the subject of browser extension, there is the browserpass-extension. It requires a background service to interface with pass, which is to be expected, but also a little messy, so for now I’ll see if I can get by without it.

Links

Setting up Raspberry Pi as an OpenVPN client for the NETGEAR R7000 Nighthawk router

Since OpenVPN isn’t too chatty about failures in its default configuration, this took me a couple of tries to get right. Hopefully this post can save you some of the time I wasted.

In the following example, I’m assuming you already have a Raspberry Pi, running Raspbian and that you can access it over the local network. From the snippets below, change the example ip 192.168.3.14, to the ip of your local device.

Router

Start off by enabling the vpn service on the router, by going to ADVANCED > Advanced Setup > VPN Service, then check off Enable VPN Service and then click Apply.

When that is done and the router has rebooted, go back to the same page and download the VPN configuration zip file, nonwindows.zip, and copy it to the Pi:

rene $ scp nonwindows.zip pi@192.168.3.14:

Pi

Log in to the Pi and set up OpenVPN:

rene $ ssh pi@192.168.3.14
pi:~$ sudo apt-get update && sudo apt-get install openvpn

Once the installation is complete, add the configuration to openvpn:

pi:~$ unzip nonwindows.zip
pi:~$ sudo cp client2.conf ca.crt client.crt client.key /etc/openvpn/
pi:~$ sudo chown root:root /etc/openvpn/{client2.conf,ca.crt,client.crt,client.key}
pi:~$ sudo chmod 600 /etc/openvpn/{client2.conf,ca.crt,client.crt,client.key}
pi:~$ ls -la /etc/openvpn/
total 28
drwxr-xr-x  2 root root 4096 Jul 13 14:13 .
drwxr-xr-x 70 root root 4096 Jul 13 14:44 ..
-rw-------  1 root root 1253 Jul 13 13:57 ca.crt
-rw-------  1 root root 3576 Jul 13 13:57 client.crt
-rw-------  1 root root  891 Jul 13 13:57 client.key
-rw-------  1 root root  180 Jul 13 13:57 client2.conf
-rwxr-xr-x  1 root root 1301 Nov 19  2015 update-resolv-conf

Assuming you’re the only one accessing this Pi, setting the owner and file permissions isn’t strictly necessary, but nevertheless good practice. There’s no reason that these files should be readable by anyone but root.

Next you should edit /etc/default/openvpn and add a directive for the new configuration to start on boot:

AUTOSTART="client2"

Now reboot the Pi and verify that a new network device has been added for the remote network:

pi:~$ ifconfig
eth0      Link encap:Ethernet  HWaddr b8:27:eb:1c:fa:81
          inet addr:10.0.0.4  Bcast:10.0.0.255  Mask:255.255.255.0
          UP BROADCAST RUNNING MULTICAST DYNAMIC  MTU:1500  Metric:1
          RX packets:4228 errors:0 dropped:0 overruns:0 frame:0
          TX packets:1781 errors:0 dropped:0 overruns:0 carrier:0
          collisions:0 txqueuelen:1000
          RX bytes:820993 (801.7 KiB)  TX bytes:246368 (240.5 KiB)
 
lo        Link encap:Local Loopback
          inet addr:127.0.0.1  Mask:255.0.0.0
          inet6 addr: ::1/128 Scope:Host
          UP LOOPBACK RUNNING  MTU:65536  Metric:1
          RX packets:13 errors:0 dropped:0 overruns:0 frame:0
          TX packets:13 errors:0 dropped:0 overruns:0 carrier:0
          collisions:0 txqueuelen:1
          RX bytes:1320 (1.2 KiB)  TX bytes:1320 (1.2 KiB)
 
tap0      Link encap:Ethernet  HWaddr da:dd:3a:80:50:7c
          inet addr:192.168.1.7  Bcast:192.168.1.255  Mask:255.255.255.0
          UP BROADCAST RUNNING MULTICAST DYNAMIC  MTU:1500  Metric:1
          RX packets:621 errors:0 dropped:0 overruns:0 frame:0
          TX packets:177 errors:0 dropped:0 overruns:0 carrier:0
          collisions:0 txqueuelen:100
          RX bytes:70344 (68.6 KiB)  TX bytes:15922 (15.5 KiB)

Et voilà, that should be all there is to it!

Addendum

In case something didn’t quite go as planned, enabling some logging might be a good idea. Here’s a filtered list of options related to logging:

pi:~$ openvpn --help | grep log
--topology t    : Set --dev tun topology: 'net30', 'p2p', or 'subnet'.
                  as the program name to the system logger.
--syslog [name] : Output to syslog, but do not become a daemon.
--log file      : Output log to file which is created/truncated on open.
--log-append file : Append log to file, or create file if nonexistent.
--suppress-timestamps : Don't log timestamps to stdout/stderr.
--echo [parms ...] : Echo parameters to log output.
--management-log-cache n : Cache n lines of log file history for usage
--mute-replay-warnings : Silence the output of replay warnings to log file.
--pkcs11-cert-private [0|1] ... : Set if login should be performed before

To make use of one of these options, it used to be, that the parameters could be passed in the OPTARGS directive of /etc/default/openvpn, but since OpenVPN has moved to using systemd, this is no longer supported. Relevant bug report.

Instead it is necessary to set them directly in each configuration. E.g. to enable append logging to a file add, edit /etc/openvpn/client2.conf and add the following line:

log-append /var/log/openvpn.log

According the the man page verbosity is set from 0-11, and by default the vpn configuration from the R7000 has verbosity set to 5. This means the log file can quickly become rather large if left in append mode unattended, so make sure you have enough room on the SD card or remove the option again, when you are done debugging. Alternatively use –management-log-cache or truncate on each run by just using –log.

N.B. In my experience the client can be a bit flaky at times and I’ve often seen the first many connection attempts end in the following errors:

TLS Error: TLS key negotiation failed to occur within 60 seconds (check your network connectivity)
TLS Error: TLS handshake failed

And then after a number of tries, suddenly come through. Don’t ask me why.

Ruby on Rails Gotcha: Asynchronous loading of Javascript in development mode

Everyone knows that you shouldn’t block page rendering by synchronously loading a big chunk of javascript in the head of your page right? Hence you might be tempted to change the default Javascript include tag, from this:

<%= javascript_include_tag 'application' %>

To this:

<%= javascript_include_tag 'application', async: true %>

Which makes perfect sense, when serving all Javascript in one big file, as is the case in production, meaning everything is defined at the same time. What about development though?

Well, in development rails is kind enough to let you work on individual Javascript files, which means it will recompile only as needed, when a single file is changed. To this effect, each file is included separately via their own script tag in the header. E.g:

<script src="/assets/jquery-87424--.js?body=1"></script>
<script src="/assets/jquery_ujs-e27bd--.js?body=1"></script>
<script src="/assets/turbolinks-da8dd--.js?body=1"></script>
<script src="/assets/somepage-b57f2--.js?body=1"></script>
<script src="/assets/application-628b3--.js?body=1"></script>

* Tags intentionally shortened in example.

There is a subtlety here that is quite important. All the scripts are loaded synchronously, one after the other, as specified by the order they appear in the application.js manifest. This means we’re guaranteed that jQuery, etc. is available once we get to our own scripts.

Now consider the the same scripts, but with async=true:

<script src="/assets/jquery-87424--.js?body=1" async="async"></script>
<script src="/assets/jquery_ujs-e27bd--.js?body=1" async="async"></script>
<script src="/assets/turbolinks-da8dd--.js?body=1" async="async"></script>
<script src="/assets/somepage-e23b4--.js?body=1" async="async"></script>
<script src="/assets/application-628b3--.js?body=1" async="async"></script>

Since all scripts in this case is loaded *asynchronously*, all previous guarantees are now lost, and we’ll very likely start seeing errors like this:

Uncaught ReferenceError: $ is not defined

Oops!

The fix is simple though: Don’t load Javascript assets asynchronously in development mode!

Here’s one way of doing it:

<%= javascript_include_tag 'application', async: Rails.env.production? %>

Happy hacking!

Rails 4 how to: User sign up with email confirmation in five minutes, using Devise and Mailcatcher

Sometimes you might find yourself wanting to quickly prototype an application that requires user sign ups. Here’s a quick guide to setting up a new rails application with user signup and email confirmation.

Example project available here: https://github.com/rhardih/rails4-with-user-signup. Each step below will be annotated with a commit linked on Github.

Set up a new rails project

  1. rails new rails4-with-user-signup -d postgresql
  2. cd rails4-with-user-signup
  3. bin/rake db:create
  4. bin/rails s

If you’re on OS X using PostgreSQL, you might see this error intially:

could not connect to server: No such file or directory Is the server running locally and accepting connections on Unix domain socket “/var/pgsql_socket/.s.PGSQL.5432”?

One extra step adjusting the config/database.yml is needed. Just uncomment the host option and you should be good to go. If you go to http://localhost:3000, you should see the familiar “Welcome aboard, You’re riding Ruby on Rails!” message page.

Commits d991a6b8d2f4.

Add Devise for user sign up and authentication

  1. Follow the Getting Started section of the Devise README. Commits be1c60be34ad3625cd.
  2. Then follow the the Devise wiki page for adding :confirmable to Users. Commits eedaab862a3e2733d84ee44b.
  3. Additonally, to make sure you can actually send email in development mode, add the following options to config/environments/development.rb:
    config.action_mailer.default_url_options = { host: ‘localhost’, port: 3000 }
    config.action_mailer.delivery_method = :smtp
    config.action_mailer.smtp_settings = {:address => “localhost”, :port => 1025} 

    Commit: 35e177.

Setup and run Mailcatcher to capture Devise sign up emails

  1. Install: gem install mailcatcher
  2. Run: mailcatcher

Test run

Open another tab at http://localhost:1080, where you can see the mailcatcher interface with an empty mail queue.

Screen Shot 2014-06-03 at 7.57.56 PM

Now go to http://localhost:3000/users/sign_up and create a new user.

Check again in the mailcatcher interface. You should now see an email with the subject “Confirmation instructions”.

Screen Shot 2014-06-03 at 8.06.06 PM

Congratulations! You’ve just set up a a new rails application with user sign up, authentication and email confirmation.

Page specific Javascript in Rails 3

Premise

One of the neat features from Rails 3.1 and up is the asset pipeline:

The asset pipeline provides a framework to concatenate and minify or compress JavaScript and CSS assets. It also adds the ability to write these assets in other languages such as CoffeeScript, Sass and ERB.

This means that in production, you will have one big Javascript file and also one big CSS file. This reduces the number of request the browser has to make and generally loads the page faster.

In the case of Javascript concatenation however, it does bring about a problem. Executing code when the DOM has loaded is commonplace in most web applications today, but if everything is included in one big file, and more importantly the same file, for all actions on all controllers, how do you run code that is specific to just a single view?

Solution(s)

Obviously there is more than one way of solving this problem, and rather unlike Rails, there doesn’t seem to be any “best practice” dictated. The closest I found is this excerpt from section 2 of the Rails Guide about the Asset Pipeline:

You should put any JavaScript or CSS unique to a controller inside their respective asset files, as these files can then be loaded just for these controllers with lines such as <%= javascript_include_tag params[:controller] %> or <%= stylesheet_link_tag params[:controller] %>.

And it isn’t even followed by an example, which seems more of an indication, that this isn’t something you should do at all.

Let’s start by this example nonetheless.

Per controller inclusion

By default Rails has only one top level Javascript manifest file, namely app/assets/javascripts/application.js which has the following content:

// This is a manifest file that'll be compiled into including all the files listed below.
// Add new JavaScript/Coffee code in separate files in this directory and they'll automatically
// be included in the compiled file accessible from http://example.com/assets/application.js
// It's not advisable to add code directly here, but if you do, it'll appear at the bottom of the
// the compiled file.
//
//= require jquery
//= require jquery_ujs
//= require_tree .

And this is included in the default layout with:

<%= javascript_include_tag "application" %>

N.B. When testing production on localhost, with e.g. rails s -e production, rails by default wont serve static assets, which application.js becomes after pre-compilation, so to avoid any problems when locally testing production, the following setting needs to be changed from false to true in config/environments/production.rb:

# Disable Rails's static asset server (Apache or nginx will already do this)
config.serve_static_assets = true

Now let’s say we have a controller, let’s call it ApplesController, and its corresponding Coffescript file, apples.js.coffee. We might try to include it as per the Rails Guide suggestion like so:

<%= javascript_include_tag params[:controller] %>

And this will work just fine in development mode, but in production produce the following error:

ActionView::Template::Error (apples.js isn't precompiled):

To remedy this, we need to do a couple of things. First off we should remove the require_tree . part from application.js, so we don’t wind up including the same script twice. Just removing the equal sign is enough:

//  require_tree .

To avoid a name clash rename apples.js.coffee to something else, e.g. apples.controller.js.coffee. Then create a new manifest file named apples.js, which includes your coffeescript file:

//= require apples.controller

Lastly, the default configuration of Rails only includes and pre-compiles application.js, so we need to tell the pre-compiler to now also include apples.js. This is also in config/environments/production.rb. Uncomment the following setting, and change search.js to apples.js:

# Precompile additional assets (application.js, application.css, and all non-JS/CSS are already added)
config.assets.precompile += %w( apples.js )

Note that this is a match, so it could also be something like '*.js' in case you have more manifests, which would be the case for per controller inclusion.

Views

The same concept as above could be extended to target individual actions/views of each controller, by having the actions be part of the manifest name. Individual javascript files could then be included like so:

<%= javascript_include_tag "#{params[:controller]}.#{params[:action}" %>

This makes an assumption that all actions on all controllers have a dedicated Javascript file. An assumption which most likely won’t be true in most cases. Another option could be an conditional include like so:

<%= yield :action_specific_js if content_for?(:action_specific_js %>

And then move the include tag to the specific views that need it.

Testing for existence of a page element or class

The DOM loaded event handler could look something like this:

jQuery ->
  if $('#some_element').length > 0
    // Do some stuff here

This could also be a class on body eg.:

jQuery ->
  if $('body.controller_name_action_name').length > 0
    // Do some stuff here

And then then the erb would be like this:

<!DOCTYPE html>
<html>
<head>
  <title>AppName</title>
  <%= stylesheet_link_tag    "application" %>
  <%= javascript_include_tag "application" %>
  <%= csrf_meta_tags %>
</head>
<body class="<%= "#{params[:controller]}_#{params[:action]}" %>">
 
<%= yield %>
 
</body>
</html>

Function encapsulation and on-page triggering

Instead of registering the handlers for DOM loaded, wrap the necessary code in a function that can be called later and then trigger that function directly in the respective view.

There is one thing we need to consider though. All Coffeescript sources for each controller get wrapped in it’s own closed scope, i.e this Coffeescript in apples.js.coffee:

apples_index = ->
  console.log("Hello! Yes, this is Apples.")

Becomes:

((
  function(){
    var a;
    a=function(){
        return console.log("Hello! Yes, this is Apples.")
    }
  }
)).call(this);

So in order for us to have a globally callable function, we must first expose it somehow. We can do this by attaching the function to the window object. Changing the above code like so:

window.exports ||= {}
window.exports.apples_index = ->
  console.log("Hello! Yes, this is Apples.")

If we insert this line in application.html.erb layout just before the closing body tag:

<!DOCTYPE html>                                                                           
<html>                                                                                    
<head>                                                                                    
  <title>AppName</title>                                                                   
  <%= stylesheet_link_tag    "application" %>                                             
  <%= javascript_include_tag "application" %>                                             
  <%= csrf_meta_tags %>                                                                   
</head>                                                                                   
<body>                                                                                    
 
<%= yield %>                                                                              
 
<%= yield :action_specific_js if content_for?(:action_specific_js) %>                     
</body>                                                                                   
</html>

We can now call the exposed function directly from our view like so:

<% content_for :action_specific_js do %>
<script type="text/javascript" language="javascript">
  $(function() { window.exports.apples_index(); });
</script>
<% end %>

Wrap up

Neither of these three examples is a “one-fit-all” solution I would say. Dividing up the Javascript source will start to make sense as soon as the Javascript codebase grows past a certain size. It might be interesting to test out, just how big that size is on a certain bandwidth, but I think that’s out of the scope for this post.

Given the fact that there isn’t really a defined best practice yet, perhaps the ruby community will come up with something better than the examples I presented here. In my opinion I think this is definitely something that could be better thought out.