Spelunking Advent of Code, Some Assembly Required – part 1 of 4 – Using a queue

This post is the first in a series, exploring a random assortment of techniques, data-structures etc. Each of which can be used to solve a puzzle from the 2015 edition of Advent Of Code, namely the first part of Day 7: Some Assembly Required.

In case you’re not familiar with Advent of Code, it is an Advent calendar for programmers of all levels and consists of a series of daily Christmas themed programming challenges. It’s made by Eric Wastl and runs from December 1st until the 24th and usually has an overarching theme and narrative from start to finish.

The puzzles tends to start off on the easier side and then gets progressively harder as the month goes along.

Spoiler alert: I’ve never actually managed to complete all 24 puzzles in time for Christmas in any year. Some of the puzzles are simply too hard for me and in fact, at the time of writing, I’ve only managed to complete an entire calendar a single year – 2017. Now whilst there is a competition aspect to Advent of Code, this seems mostly dominated by people who do competitive programming. For other mere mortals, many use it as an opportunity to get acquainted with a new language for instance. I feel the learning aspect is really the core of Advent of Code rather than the competition.

It’s about the journey, not the destination.

Obviously solutions can be looked up if you get stuck. This post itself is a case in point. Personally though, I prefer to fail a puzzle if I cannot figure it out. Sometimes it takes tumbling a problem around in your head for awhile before you can find a new approach or another place to look for inspiration. By looking up solutions, you might rob yourself of a very rewarding Aha! moment.

The puzzle

The story behind this one, is that we need to help little Bobby Tables assemble an electronics circuit brought to him by Santa.

We are given a series of instructions, each describing a step in how to assemble the circuit using wires and bitwise logic gates. Once assembled, we should be able to answer what signal value a specific wire has if the circuit was live.

Here is the sample circuit provided as an example, along with the expected output on each wire after the circuit has been run:

123 -> x
456 -> y
x AND y -> d
x OR y -> e
x LSHIFT 2 -> f
y RSHIFT 2 -> g
NOT x -> h
NOT y -> i
d: 72
e: 507
f: 492
g: 114
h: 65412
i: 65079
x: 123
y: 456

Input

There’s a few things to note which isn’t apparent from the above sample. The following points are revealed by looking at the real puzzle input instead:

  1. Ordering of instructions is arbitrary. That means instructions can reference wires, before they’ve been assigned a signal.
  2. Direct signal assignment can come from both numbers and wires.
  3. The lefthand side of an AND instruction can be both a number and a wire.
  4. Wire identifiers are a maximum of two letters.

My version of the full input is available here.

Due to the arbitrary ordering, instructions cannot necessarily be carried out in a top-to-bottom manner. There might be a dependency issue on the propagation of signal values, which has to be resolved beforehand. E.g., and in other words, we cannot carry out an instruction with two wires if they don’t both have a signal.

Why this particular puzzle?

Many puzzles has some sort of trick to them, which makes a quick brute force approach infeasible. Some require knowledge about a single specific type of algorithm or data structure and will be quite hard to solve without. Others, like this one, is inherently more open and can be solved in a number of different ways. It’s primarily up to the preference and experience of the participant.

I quite like that it models a real world thing as well. It’s a programming problem firstly, but you can easily imagine building a circuit in this manner if you had the same base components. Aside from that it also introduces the participant to various computing fundamentals such as a 16-bit architecture, bitwise operations and logic gates. It even has a domain-specific language to define the circuit with!

Queues

Wikipedia obviously has a very in-depth description about queues as a datatype, but this simple illustration should be more than enough to get the idea.

Queue

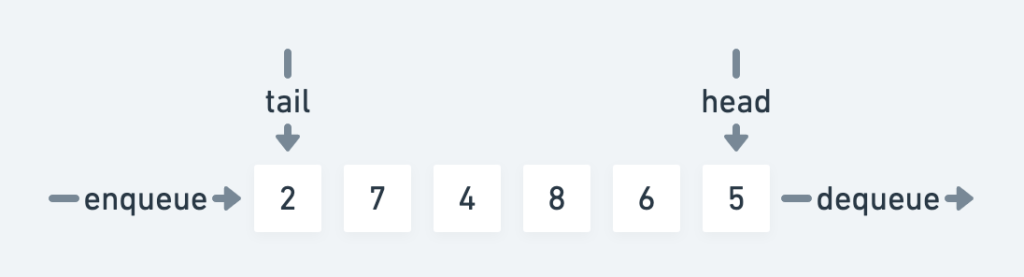
The queue has a front and a back, or head and a tail if you will. It’s a simple collection of elements, in this case numbers, and what makes it different from say a plain list or an array, is that adding and removing elements from the queue happens in an ordered way. The first element added will be the first one to be removed again. This is also known as a first-in-first-out (FIFO) data structure.

Solution

To be honest this approach can probably be considered quick and dirty. It’s not efficient, nor is it particularly elegant. It is, however, not very complicated either.

Outline

Before starting, we need a way to keep track of the overall state of the circuit and for that we use an associative array. It will map the name of a wire to its current signal value.

In short the idea of the solution is to queue up all the instructions first and then continuously try to dequeue and run one. If it’s not possible to carry out an instruction, we put it back on the queue. Rinse and repeat until all instructions are done.

Here’s the details as a stepwise pseudo algorithm:

  1. Read all instructions into a queue.
  2. While the queue is not empty:
    1. Take an instruction off of the queue.
    2. If the instruction can be performed, i.e. all required signals are present. Carry out the instruction and store the resulting signal value on the target wire.
    3. If the instruction cannot be performed, push it back onto the queue.
  3. Print out the value of desired target wire.

Source

Below is a Ruby version of this approach. Whilst Ruby is a really nice language, there’s not really any specific reason for choosing it here, aside from it having an implementation of a Queue as part of the standard library.

Note: Ruby doesn’t have 16-bit numbers natively, and since this problem specifically calls for it, it’s necessary to bound the value of computations.

We carry out 1. on line 5 and then we enter the loop in 2. on line 17. In the loop we use Rubys ability to regex match case statements in order to find the correct instruction. Then for each instruction, we test if it can be carried out by checking if there’s already a stored signal value for the referenced wires. The remainder of the code should be self-explanatory.

Since the input is read directly from stdin, running it can be done like so:

$ ruby 7p1-queue.rb < 7.in

Run-time analysis

The solution might be simple, but the tradeoff of just trying instructions until the shoe fits, means that the run-time complexity is quite poor. If we assume being able to carry out and remove, at least one instruction every loop, we wind up iterating as follows:

n + (n - 1) + … + 2 + 1

In other words, the sum from 1 to n. This is an arithmetic progression with the following solution:

n * (n + 1) / 2

If we expand this to n^2/2 + n/2 and get rid of the non-dominant terms this yields a worst case running time of O(n^2).

Inside the loop we could consider the run-time of queue operations, hash lookups and regular expression matches, but I’ll go out on a limb here, and wager, that for this particular program, none of these are more expensive than O(n) in the worst case. That means n^2 is still the dominating term, and so we can accept O(n^2) as the run-time complexity.

Luckily the number of instructions in the input isn’t very long:

$ wc -l 7.in
     339 7.in

In this case, a quadratic run-time is still viable for a fast solution:

$ time ruby 7p1-queue.rb < 7.in
Signal ultimately provided to wire a: 16076

real    0m0.225s
user    0m0.150s
sys     0m0.054s

Memory usage

If we add a bit of memory profiling using the excellent memory_profiler gem, we can see the following allocations:

$ ruby 7p1-queue.rb < 7.in | head -3
Signal ultimately provided to wire a: 16076
Total allocated: 4.61 MB (56660 objects)
Total retained: 28.23 kB (341 objects)

We do load the entire input file into memory, but considering its size:

$ stat -f %z 7.in
5304

Which is just slightly above 5KiB, this should clearly not be the culprit. This is probably just a very memory hungry way to do things.

If we inspect the profiler output further, it’s clear that we’ve paid a dear price for using the syntactic sugar; Regexp#=== pattern for the case statement.

allocated memory by class
-----------------------------------
   3.05 MB  MatchData
   1.53 MB  String
  14.43 kB  Hash
   3.53 kB  Array
   76.00 B  Thread::Queue
   72.00 B  Thread::Mutex

In the next post we’ll take a look at a solution based on sorting, whereby we can avoid the problem caused by arbitrary ordering of instructions. Part 2.

Benchmark numbers for Tesseract on Android

Here’s an interesting find, I came upon recently.

In the the process of moving an Android app project of mine, Camverter, off the now ageing version r10e of the Android NDK and onto version r18b, I had to rebuild some of its dependencies as well, in order to to maintain standard library compatibility.

In r18b GCC has been removed, in favour of Clang, so I decided I wanted to gauge any performance differences, that that change might have incurred. One such dependency is Tesseract, which is a main part of the OCR pipeline of the app.

In this post we’ll be looking at how it performs, with versions built by both compilers.

Build

To build an Android compatible shared library of Tesseract, I’m using a homegrown build system based on Docker, aptly named Building for Android with Docker, or bad for short. I won’t go into details about that project here, but feel free to check it out nonetheless.

The docker files I’ve used for each version of the NDK is linked here:

Aside from using different NDKs and a few minor changes to the configure flags, they’re pretty much alike.

To note, in both cases the optimisation level of GCC was set to -O2:

root@3495122c4fa2:/tesseract-3.05.02# grep CXXFLAGS Makefile
CXXFLAGS = -g -O2 -std=c++11

Testing

To benchmark the performance of tesseract, I’ve added a very simple test that runs OCR on the same 640×480 black and white test image, ten times in a row1, and then outputs the average running time:

Test Image
Test Image

Full source of the test available here.

Test devices

Currently the range of my own personal device lab, only extends to the following two devices. It’s not extensive, but given their relative difference in chipset, I think they’ll provide an adequately varied performance insight:

  • Sony Xperia XZ1 Compact (Snapdragon 835 running Android 9).
  • Samsung Galaxy S5 G900F (Snapdragon 801 running Android 6.01).

Results

In the chart below it’s apparent, that there’s a significant performance increase to be gained, by switching from GCC to Clang.

This roughly translates into a 28.3% reduction for the Samsung, and a whopping 38.7% decrease for the Sony. Thank you very much Sir Clang!

Graph of execution times for Tesseract v3.05.02

Bonus

Additionally I decided to run a similar test for version 4.0.0 (non lstm) of Tesseract as well. The test source and Dockerfile for building v4.0.0 is likewise available in the bad repository.

In this instance however, I simply couldn’t get a successful build with r10e, hence I only have numbers for Clang.

Graph of execution times for Tesseract v4.0.0

Once again, there’s a handy performance increase to be had.

Comparison

Execution time reduction for v4.0.0 (r18b / Clang), compared to v3.05.02:

r10e r18b
S5 39.2% 15.3%
XZ1 50.5% 19.3%

That’s a 2X increase in performance, in the case of the Sony, going from v3.05.02 compiled with GCC to v4.0.0 compiled with Clang.

That is pretty awesome, and I’m sure users of the app will welcome the reduced battery drain.

Footnotes

  1. I believe I got this image originally from the Tesseract project itself, but I’ve failed to find the source.

Behind the scenes of shell IO redirection

In the day to day toils on a command-line, it can be easy to overlook the complexities behind many of the constructs you use all the time.

In a POSIX shell, one such construct is the ability to pipe between, as well as redirect input and output of various commands with <, > and |.

Let’s stop and smell the roses, and ask; How does this actually work?

As an example, have you ever wondered, what happens under the hood, when you write a command like this?

cat foo.txt > bar.txt

That’s what we’ll take a look at in this post.

dtruss

In order for us to look into the belly of the beast, so to speak, we’ll need a tool to monitor system calls for a given process.

Since I’m doing this on an OS X system, the tool of choice is dtruss, a DTrace version of truss. On Linux strace can be used instead.

If you’re not interested in trying this out for yourself, skip on ahead to the Inspection section.

Preflight checklist

By default dtruss doesn’t work because of the System Integrity Protection (SIP), security feature of OS X. If you try to attach to a running process, you’ll get this error message from dtrace initially:

$ sudo dtruss -f -p 43334
dtrace: system integrity protection is on, some features will not be available

And then the log will be filled with dtrace errors like this, as soon as the process makes any system calls:

dtrace: error on enabled probe ID 2633 (ID 265: syscall::ioctl:return): invalid user access in action #5 at DIF offset 0

In order to work around this problem, it’s possible to disable SIP for dtrace exclusively. Reboot OS X in recovery mode and enter the following command in a terminal:

csrutil enable --without dtrace

You’ll see the following warning message:

This is an unsupported configuration, likely to break in the future and leave your machine in an unknown state.

That’s ok for now. Restoring the default configuration later can be done with:

csrutil enable

Reboot to normal mode again and open a terminal.

Noise reduction

To reduce the amount of unrelated events in the output from dtruss, it’s a good idea to run commands in a minimal environment without various hooks and other modern shell niceties.

Starting up, e.g. a new instance of bash, without inheriting the parent environment and loading a profile or rc, can be done like so:

env -i bash --noprofile --norc

Take-off

In the minimal bash instance just started, get the process ID of the shell:

bash-3.2$ echo $$
529

Now we’re ready to start monitoring. Open up a separate shell; note this doesn’t have to be minimal like above. Start up dtruss, attaching it to the bash process:

$ sudo dtruss -p 529 -f

The -f here makes sure any forked children is followed as well. If all went well, you’ll see this header appear:

PID/THRD SYSCALL(args) = return

Now we’re ready to issue our command with output redirection.

Run

I’m using the following small test file in this example, but any file will do really:

Back in our minimal bash shell, we’ll issue this simple command, redirecting stdout to the file bar.txt:

cat foo.txt > bar.txt

Now let’s take a look at what dtruss has picked up.

Inspection

After running the command, we should see a lot of stuff in the log output from dtruss.

The full output I got from dtruss can be found in this gist. For a better overview, I created a filtered version with irrelevant system calls omitted:

grep -v -E "ioctl|sigaction|sigprocmask|stat64|mprotect" dtruss.log > dtruss.short.log

Here’s the shortened version:

Target file

Quickly skimming the log reveals, that we’re looking at two different process ID / thread ID pairs. Namely 1436/0x5b3d on lines 1-5 and 36-39, as well as 1458/0x5c1d from 6 to 35.

The reason for this, is that the shell utilises a fork-exec approach, for running program binaries, e.g. cat, or anything that isn’t a shell builtin really.

The way it works, is by the parent process, in this case 1436, calling fork. This makes a copy of the current process and continues execution in both, albeit with some important differences.

In the child, fork returns with a value of zero and in the parent, it returns the process id of the forked child. That way it’s determined which of the two will subsequently transform into a new process through one of the exec family of system calls. In this case the dtrace probe is unable to properly trace it, but on line 21 we see an error for an execve call, so that is most likely the one in this case.

From line 6 the log output is coming from the child process. The first lines of interest here is 11-13. Let’s look at them one at a time.

On line 11, we can see an open system call for the file bar.txt returning successfully with a file descriptor value of 3, or 0x3 if you will.

Next on line 12, there is a dup2 call, with the descriptor value for bar.txt and then 0x1.

The man page for dup2 is somewhat awkwardly worded, but in short, this means “change whatever file descriptor 0x1 is pointing to, to whatever file descriptor 0x3 is pointing to”.

We already know 0x3 is a descriptor for bar.txt, but what about 0x1?

In POSIX any process has three standard streams made available by the host system, stdin, stdout and stderr, which by definition have the values 0, 1 and 2.

That means the dup2 call effectively changes the descriptor for stdout to point to the same thing as the descriptor for bar.txt. This is relevant, since cat reads files and writes them to the standard output.

On line 13 there is a close call on the descriptor for bar.txt. Now this may seem weird, since no data has actually been written to the file yet, but keep in mind this is only releasing the file descriptor. It doesn’t do anything to the file itself. Remember the descriptor for stdout now points to bar.txt, so the new descriptor is no longer needed and can just as well be made available to the system again.

Source file

The next lines of interest is 29-33.

On line 29, we again see another open call, but this time for foo.txt. Since the descriptor 0x3 was released on line 13, it is the first one available and is reused here.

On line 30-31 we see a read call on descriptor 0x3, which puts the content of foo.txt into memory, followed by a write on the stdout descriptor. Remembering stdout now points to bar.txt, we can assert the content of foo.txt has been written to bar.txt.

With line 32-33 a final read on the descriptor of foo.txt returns zero, which indicates end-of-file, followed by an immediate close.

On line 35, the last event from the child process closes stdin, with a call to close_nocancel.

Finally, on line 36, we see control return to the parent process with wait4, which waits for the child process to finish.

After this the log trace ends and the command is done.

Recap

So, to come full circle, when you enter a command like this:

cat foo.txt > bar.txt

What really happens behind the scenes, is the following:

  1. A child process is spawned from current process.
    1. The child process is transformed to a new process for cat via an exec type call.
    2. bar.txt is opened for writing, creating a new file descriptor.
    3. The file descriptor for stdout is made to point to bar.txt.
    4. The new descriptor is closed.
    5. foo.txt is opened for reading, creating a new file descriptor.
    6. A read to memory from the new descriptor of foo.txt is done.
    7. A write from memory to the descriptor of stdout is done.
    8. The new descriptor of foo.txt is closed.
    9. The descriptor of stdout is closed.
  2. Parent process waits for child to finish.
  3. Done.

It’s not all magic, but pretty close.

Further reading

References

Setting up Raspberry Pi as an OpenVPN client for the NETGEAR R7000 Nighthawk router

Since OpenVPN isn’t too chatty about failures in its default configuration, this took me a couple of tries to get right. Hopefully this post can save you some of the time I wasted.

In the following example, I’m assuming you already have a Raspberry Pi, running Raspbian and that you can access it over the local network. From the snippets below, change the example ip 192.168.3.14, to the ip of your local device.

Router

Start off by enabling the vpn service on the router, by going to ADVANCED > Advanced Setup > VPN Service, then check off Enable VPN Service and then click Apply.

When that is done and the router has rebooted, go back to the same page and download the VPN configuration zip file, nonwindows.zip, and copy it to the Pi:

rene $ scp nonwindows.zip pi@192.168.3.14:

Pi

Log in to the Pi and set up OpenVPN:

rene $ ssh pi@192.168.3.14
pi:~$ sudo apt-get update && sudo apt-get install openvpn

Once the installation is complete, add the configuration to openvpn:

pi:~$ unzip nonwindows.zip
pi:~$ sudo cp client2.conf ca.crt client.crt client.key /etc/openvpn/
pi:~$ sudo chown root:root /etc/openvpn/{client2.conf,ca.crt,client.crt,client.key}
pi:~$ sudo chmod 600 /etc/openvpn/{client2.conf,ca.crt,client.crt,client.key}
pi:~$ ls -la /etc/openvpn/
total 28
drwxr-xr-x  2 root root 4096 Jul 13 14:13 .
drwxr-xr-x 70 root root 4096 Jul 13 14:44 ..
-rw-------  1 root root 1253 Jul 13 13:57 ca.crt
-rw-------  1 root root 3576 Jul 13 13:57 client.crt
-rw-------  1 root root  891 Jul 13 13:57 client.key
-rw-------  1 root root  180 Jul 13 13:57 client2.conf
-rwxr-xr-x  1 root root 1301 Nov 19  2015 update-resolv-conf

Assuming you’re the only one accessing this Pi, setting the owner and file permissions isn’t strictly necessary, but nevertheless good practice. There’s no reason that these files should be readable by anyone but root.

Next you should edit /etc/default/openvpn and add a directive for the new configuration to start on boot:

AUTOSTART="client2"

Now reboot the Pi and verify that a new network device has been added for the remote network:

pi:~$ ifconfig
eth0      Link encap:Ethernet  HWaddr b8:27:eb:1c:fa:81
          inet addr:10.0.0.4  Bcast:10.0.0.255  Mask:255.255.255.0
          UP BROADCAST RUNNING MULTICAST DYNAMIC  MTU:1500  Metric:1
          RX packets:4228 errors:0 dropped:0 overruns:0 frame:0
          TX packets:1781 errors:0 dropped:0 overruns:0 carrier:0
          collisions:0 txqueuelen:1000
          RX bytes:820993 (801.7 KiB)  TX bytes:246368 (240.5 KiB)
 
lo        Link encap:Local Loopback
          inet addr:127.0.0.1  Mask:255.0.0.0
          inet6 addr: ::1/128 Scope:Host
          UP LOOPBACK RUNNING  MTU:65536  Metric:1
          RX packets:13 errors:0 dropped:0 overruns:0 frame:0
          TX packets:13 errors:0 dropped:0 overruns:0 carrier:0
          collisions:0 txqueuelen:1
          RX bytes:1320 (1.2 KiB)  TX bytes:1320 (1.2 KiB)
 
tap0      Link encap:Ethernet  HWaddr da:dd:3a:80:50:7c
          inet addr:192.168.1.7  Bcast:192.168.1.255  Mask:255.255.255.0
          UP BROADCAST RUNNING MULTICAST DYNAMIC  MTU:1500  Metric:1
          RX packets:621 errors:0 dropped:0 overruns:0 frame:0
          TX packets:177 errors:0 dropped:0 overruns:0 carrier:0
          collisions:0 txqueuelen:100
          RX bytes:70344 (68.6 KiB)  TX bytes:15922 (15.5 KiB)

Et voilà, that should be all there is to it!

Addendum

In case something didn’t quite go as planned, enabling some logging might be a good idea. Here’s a filtered list of options related to logging:

pi:~$ openvpn --help | grep log
--topology t    : Set --dev tun topology: 'net30', 'p2p', or 'subnet'.
                  as the program name to the system logger.
--syslog [name] : Output to syslog, but do not become a daemon.
--log file      : Output log to file which is created/truncated on open.
--log-append file : Append log to file, or create file if nonexistent.
--suppress-timestamps : Don't log timestamps to stdout/stderr.
--echo [parms ...] : Echo parameters to log output.
--management-log-cache n : Cache n lines of log file history for usage
--mute-replay-warnings : Silence the output of replay warnings to log file.
--pkcs11-cert-private [0|1] ... : Set if login should be performed before

To make use of one of these options, it used to be, that the parameters could be passed in the OPTARGS directive of /etc/default/openvpn, but since OpenVPN has moved to using systemd, this is no longer supported. Relevant bug report.

Instead it is necessary to set them directly in each configuration. E.g. to enable append logging to a file add, edit /etc/openvpn/client2.conf and add the following line:

log-append /var/log/openvpn.log

According the the man page verbosity is set from 0-11, and by default the vpn configuration from the R7000 has verbosity set to 5. This means the log file can quickly become rather large if left in append mode unattended, so make sure you have enough room on the SD card or remove the option again, when you are done debugging. Alternatively use –management-log-cache or truncate on each run by just using –log.

N.B. In my experience the client can be a bit flaky at times and I’ve often seen the first many connection attempts end in the following errors:

TLS Error: TLS key negotiation failed to occur within 60 seconds (check your network connectivity)
TLS Error: TLS handshake failed

And then after a number of tries, suddenly come through. Don’t ask me why.

Interactive visualisation of Pi and friends with D3.js

Inspiration

I recently stumbled onto the magnificent posters created by Martin Krzywinski over at http://mkweb.bcgsc.ca/pi/. He’s come up with some truly original ways to illustrate the appearance and complexity of various irrational numbers.

Specifically, I really liked the minimalism and simplicity of the 2013 edition, shown here:

pi-dots-01

The rules used for generating the coloured dots is fascinatingly simple. Each digit 0-9 is assigned a unique colour. The i’th circle is then coloured according to the value of the i’th digit of Pi. The smaller circle inside is coloured based on the value of the following digit.

Simple rules, complex outcome.

Martin created other versions as well, e.g. one where adjacent equals are connected by same coloured lines. They’re all fascinating and you can even buy them as posters!

Interactive

Looking at these posters I couldn’t help wonder, what lay beyond the chosen boundaries for each poster. What if some great pattern or sequence was lurking just outside of view? If only there was a way to go explore further digits and other constellations using the same visualisation format.

Always the tinkerer, this got me thinking about how to create something like that. One thing led to another and before long I had a rough prototype cobbled together with D3.js.

I spent a bit more time adding a few input controls and polishing it into a neat little demo. I’ve put it up at:

winski.rhardih.io

Go try it out! Instructions are at the bottom.

As an example, this is how the Feynman Point looks, at a column width of 31:

Screen Shot 2016-06-10 at 12.30.29

For the more curious out there, I’ve put the code on GitHub at github.com/rhardih/winski.

Happy π hunting!